From Newbie to Know-it-all

technology expertI knew nothing about Project, QuickBooks, Visio, Basecamp and other tools when I started. I was a project manager and business owner faced with complicated tools I needed to do my jobs. Here are the techniques I use to master software quickly:

Take classes: Take more than one. Different teachers cover different topics and might provide great tips you haven’t heard anywhere else. Students learn in different ways – listening, watching, doing, and so on —  so it’s important to find an instructor who teaches in a way that resonates with you.

Read a book or two: If you’re really serious about mastering a product, get a book about it. Books can go into a lot more detail. Plus they have indexes to help you find topics and paper books are easy to flip through. eBooks are easy to search.

Read blogs about the product: Whether it’s the product blog or a blog from another organization, you can find incredibly helpful information there.

Search help: But don’t start in the in-product help. Use your browser and try different combinations of keywords or phrases. You’ll find results from product help but also from numerous other sites. Those other sites often have more detailed answers and great troubleshooting tips. Click the results that sound most like your question. If you don’t find an answer, click other results or try new keywords in your search. I have a very old HP LaserJet printer that works like a champ. I followed many links and eventually found info on the driver I needed to get the printer to work with Windows 10 – buried deep within HP help.

Post questions in product forums/groups: Product-related groups on LinkedIn, forums on the product website or forums hosted by other organizations have lots of knowledgeable people willing to share their expertise. You’re more likely to get helpful answers if you describe your issue in detail. Include the steps you took, what you expected, and what happened instead.

Explore on your own: Poke around the software. Try things. Test what happens when you perform different steps or use different software options. Use sample files to experiment. The more you do this, the better you’ll get at discovering things on your own.

Note: It’s tempting to immediately jump to asking an expert for an answer. That’s reasonable when you’re facing a tight deadline. However, you’ll learn and remember more when you expend some effort finding your answer.

Check out my courses on Linked In Learning here.

This post contains affiliate links, and I will be compensated if you click my links and make a purchase.

#project, #quickbooks, #projectpointers, #bonniebiafore

 

Choosing the Right Dependency Between Project Activities

The schedule logic for a project is the collection of dependencies you create between activities. The goal of this schedule logic is to provide a realistic model of when project activities should occur. Want to up your scheduling game? This article explains when to use each dependency type to link activities.

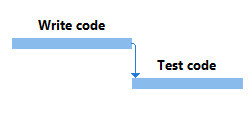
Finish-to-start is the one you’ll use most often. A finish-to-start dependency tells you that when one activity (called the predecessor) finishes, the next activity (the successor) can start. For example, you have to finish writing some code before you can test it. If you don’t work in software, maybe this example will resonate: when your older child teases the younger one, the younger one starts crying.

On the other hand, the start-to-finish dependency type is rare (which is a gift because it’s also confusing). This dependency means that the start of one activity determines when another one finishes. It’s confusing because the predecessor occurs later than the successor, as shown in the figure, and most people think of predecessors occurring before successors. (Remember, with dependencies, the predecessor is the activity that controls the timing of the successor, not when it occurs time-wise.) For example, consider a sales clerk who works a shift in a retail store. To keep the store open for customers, the clerk for the next shift has to show up to start his or her shift before the sales clerk on duty can go home (finish the shift).

Let’s look at the remaining two dependency types: start-to-start and finish-to-finish.

Suppose one person is scheduled to spend 10 days writing software documentation and another one is scheduled to work 10 days reviewing the documentation to make sure it’s accurate and clear. At first glance, you might think start-to-start and finish-to-finish dependencies work equally well. When the writing starts, the review could start almost immediately. Or, when the writing is complete, the review could finish soon after.

But start-to-start dependencies can cause trouble if activities don’t occur as scheduled. Suppose the writer runs into issues with the software and the writing task is going to take 15 days instead of 10. As you can see in the figure, the writing and review started at the same time, which means that the review is scheduled to finish 5 days before the writing. Some of the writing wouldn’t get reviewed unless you caught this error in your schedule logic.

The writing and review activities should be linked with a finish-to-finish dependency. That way, the schedule logic guarantees that the review doesn’t finish until the writing is complete, even if the writing takes longer. This dependency also works if the review takes less time than writing—say, 5 days. With finish-to-finish, you could wait 5 days before starting to review documentation, as shown in the figure below. If the writing takes longer than you expect, the delayed finish date for writing also delays the finish for review.

As you can see, almost all your dependencies will be finish-to-start or finish-to-finish. Another dependency best practice is to avoid negative lag (also called lead), because it implies that you know when the predecessor activity will finish. (You can explore this practice in this movie from my revamped and updated course, Project Management Foundations: Scheduling, which was released in April 2018).

Saving Customized Views in Project

Saving custom views is easy when you plan ahead. Modifying a built-in view and then saving it as a custom view is still easy, but it does take a few more steps.

If you set out to save a customized view to use again and again, the steps are easy:

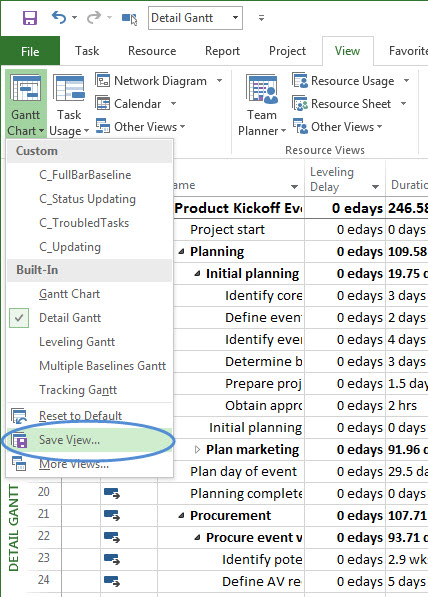
1. Display the built-in view that’s closest to what you want, like the Detail Gantt view.

2. On the Task tab or View tab, click the bottom half of the Gantt Chart button, and then choose Save View.

3. In the Save View dialog box, name the view, for instance, C_Updating, and then click OK.

I like to add C_ at the beginning of each custom view, so they’re easy to spot in drop-down lists and in the global template.
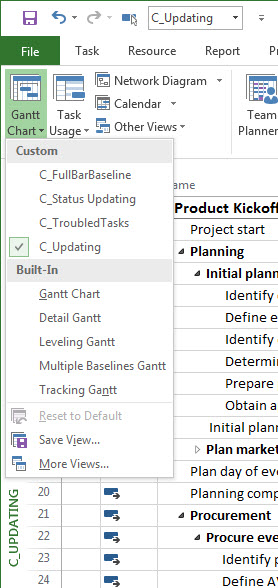
Project creates the new view and a new table (C_Updating Table1) to go with it.

4. Now you can customize the view and table however you want.

The custom view is available to use in the future – and the original built-in view is still available.

What if you display a built-in Project view and go wild building a super-cool customized view with filters, groups, timescale settings, table columns, and formatting? THEN you realize you want your creation to be a custom view and you want the original built-in views definition back. No biggie. A few more steps get you where you want to be.

Suppose you want a view for updating tasks. You’ve displayed the built-in Tracking Gantt view, applied the In Progress Tasks filter, set the timescale to days, and added and rearranged columns in the table. Remember, when you modify a built-in view, Project saves copies of the modified view and table in your Project file (using the built-in view and table names). The global template still contains the original built-in definition of the view and table.

Here’s what you do to save the modified view as a new one and bring back the original built-in view:

1. On the View tab, click the bottom half of the Gantt Chart button (or any other view button like Task Usage or Resource Usage), and then choose Save View.

2. In the Save View dialog box, name the view, like C_TaskUpdating, and then click OK.

Just like saving a view before you add all the modifications, Project saves the new view and a new table, in this example, C_TaskUpdating for the view and C_TaskUpdating Table 1 for the table. If you have the “Automatically add new views, tables, filters, and groups to the global” option turned on (it’s in the Project Options dialog box Advanced category), Project also saves the new view and table to your global template.

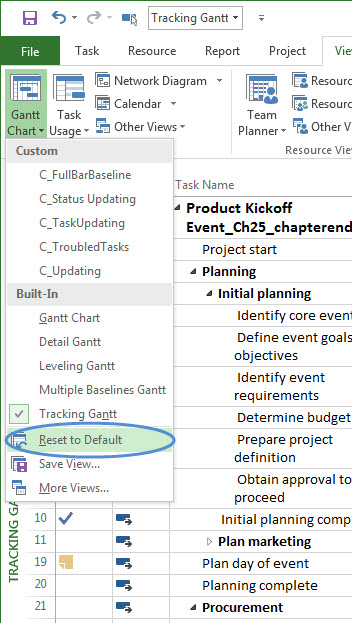
3. To get the built-in view (Tracking Gantt in this example) back to its original definition, click the bottom half of the Gantt Chart button (or the appropriate view button on the View tab) and choose the built-in view.

4. Click the bottom half of the Gantt Chart button (or other view button) again. This time, on the drop-down menu, choose Reset to Default.

5. When the message appears telling you that you are about to revert to the view from your global template, click Yes.


Now, you have your new view with all its customization, and your built-in view is back to the original definition.

On another note, what if other team members need access to your project along with your custom view handiwork but don’t have Microsoft Project? You might want to check out Microsoft Project Viewer.