Posts

Saving Customized Views in Project

Saving custom views is easy when you plan ahead. Modifying a built-in view and then saving it as a custom view is still easy, but it does take a few more steps.

If you set out to save a customized view to use again and again, the steps are easy:

1. Display the built-in view that’s closest to what you want, like the Detail Gantt view.

2. On the Task tab or View tab, click the bottom half of the Gantt Chart button, and then choose Save View.

3. In the Save View dialog box, name the view, for instance, C_Updating, and then click OK.

I like to add C_ at the beginning of each custom view, so they’re easy to spot in drop-down lists and in the global template.
Project creates the new view and a new table (C_Updating Table1) to go with it.

4. Now you can customize the view and table however you want.

The custom view is available to use in the future – and the original built-in view is still available.

What if you display a built-in Project view and go wild building a super-cool customized view with filters, groups, timescale settings, table columns, and formatting? THEN you realize you want your creation to be a custom view and you want the original built-in views definition back. No biggie. A few more steps get you where you want to be.

Suppose you want a view for updating tasks. You’ve displayed the built-in Tracking Gantt view, applied the In Progress Tasks filter, set the timescale to days, and added and rearranged columns in the table. Remember, when you modify a built-in view, Project saves copies of the modified view and table in your Project file (using the built-in view and table names). The global template still contains the original built-in definition of the view and table.

Here’s what you do to save the modified view as a new one and bring back the original built-in view:

1. On the View tab, click the bottom half of the Gantt Chart button (or any other view button like Task Usage or Resource Usage), and then choose Save View.

2. In the Save View dialog box, name the view, like C_TaskUpdating, and then click OK.

Just like saving a view before you add all the modifications, Project saves the new view and a new table, in this example, C_TaskUpdating for the view and C_TaskUpdating Table 1 for the table. If you have the “Automatically add new views, tables, filters, and groups to the global” option turned on (it’s in the Project Options dialog box Advanced category), Project also saves the new view and table to your global template.

3. To get the built-in view (Tracking Gantt in this example) back to its original definition, click the bottom half of the Gantt Chart button (or the appropriate view button on the View tab) and choose the built-in view.

4. Click the bottom half of the Gantt Chart button (or other view button) again. This time, on the drop-down menu, choose Reset to Default.

5. When the message appears telling you that you are about to revert to the view from your global template, click Yes.


Now, you have your new view with all its customization, and your built-in view is back to the original definition.

On another note, what if other team members need access to your project along with your custom view handiwork but don’t have Microsoft Project? You might want to check out Microsoft Project Viewer.


Working with Multiple Project Baselines

I wrote a guest post about multiple project baselines for Erik Van Hurck’s blog, The Project Corner. Follow the link to learn about the contest we’re running: we’re giving away two copies of my books. Here’s the post:

A baseline is the key to staying on top of where your project is compared to where it should be. When you set a baseline in Project (you can set up to 11), the program takes a snapshot of schedule and cost values, which you can then use to see how current values compare to what you originally planned. What can you do with Project’s baselines? And how do you view them when you have more than one?

Saving more than one baseline comes in handy in several situations. Suppose you incorporate a big change request into your project plan. Keeping your original baseline is a good idea, especially when you want to answer stakeholder questions about why the big difference from the original dates and cost. At the same time, you can use the new baseline with the change request to track performance for the plan with the change request in place.

An additional baseline might be called for when a project experiences other types of changes: stakeholders dramatically increase or decrease the project scope or a higher priority project puts yours temporarily on hold. The original baseline values no longer produce meaningful variances, so you need a new baseline that reflects the revised schedule and cost.

Multiple baselines can also help document trends over time. Suppose your project has fallen behind schedule and you implement a recovery strategy. You can keep the original baseline, but set a new one using the values in place before you start the recovery. That way, you can compare your original variances to recovery variances to see whether your course correction is helping. Another way to evaluate trends is to add baselines at key points in a project, such as at every fiscal quarter or perhaps at the end of each phase.

Setting Multiple Baselines

If you’re going to use multiple baselines, it’s a good idea to store a second copy of your original baseline, for example, to Baseline 1 fields. That way, you have a copy of the original baseline for posterity. At the same time, you can keep your most recent baseline in Project’s Baseline fields, so it’s easy to see the variances from your most recent baseline in the default Variance fields.

Here’s how to set multiple baselines while easily keeping track of variances for the most recent one:

  1. Head to the Project tab’s Schedule section, and choose Set Baseline –> Set Baseline. The Set Baseline dialog box opens.
  2. In the “Set baseline” drop-down list, save your first baseline by choosing Baseline1.
  3. Make sure the “Entire project” option is selected. This option saves baseline values for the entire project, which is what you want the first time around.
  4. Click OK. Project stores the current values for start, finish, duration, work, and cost in the corresponding fields, such as Baseline1 Start, Baseline1 Finish, Baseline1 Duration, Baseline1 Work, and Baseline1 Cost.
  5. Immediately repeat steps 1 through 4 to save the original baseline a second time, but this time as Baseline.

When you open the Set Baseline dialog box after saving at least one baseline, the “Set baseline” drop-down list shows the last saved date for the baseline. For example, baselines that have been set have “(last saved on mm/dd/yy)” appended to the end of their names, where mm/dd/yy is the last saved date for that baseline.

If you try to set a baseline that has already been saved, Project warns you that the baseline has been used and asks if you want to overwrite it. Click Yes to overwrite the baseline’s existing values (for example, if you’ve used up all 11 baselines and want to reuse an older one). If you don’t want to overwrite it, click No, and then, back in the Set Baseline dialog box, select a different baseline.

When you’re ready to save another baseline, here’s what you do:

  1. In the Project tab’s Schedule section, choose Set Baseline –>Set Baseline.
  2. In the “Set baseline” drop-down list, choose Baseline2 to permanently save the second baseline. Make sure the “Entire project” option is selected, and then click OK.
  3. Immediately save the current project schedule again as Baseline. That way, The Variance fields like Start Variance, Finish Variance, and Cost Variance show the variances between your current values and those for your most recent baseline.

Note: For each additional baseline, save the project schedule once as Baseline and once as the next empty baseline.

Viewing Multiple Baselines

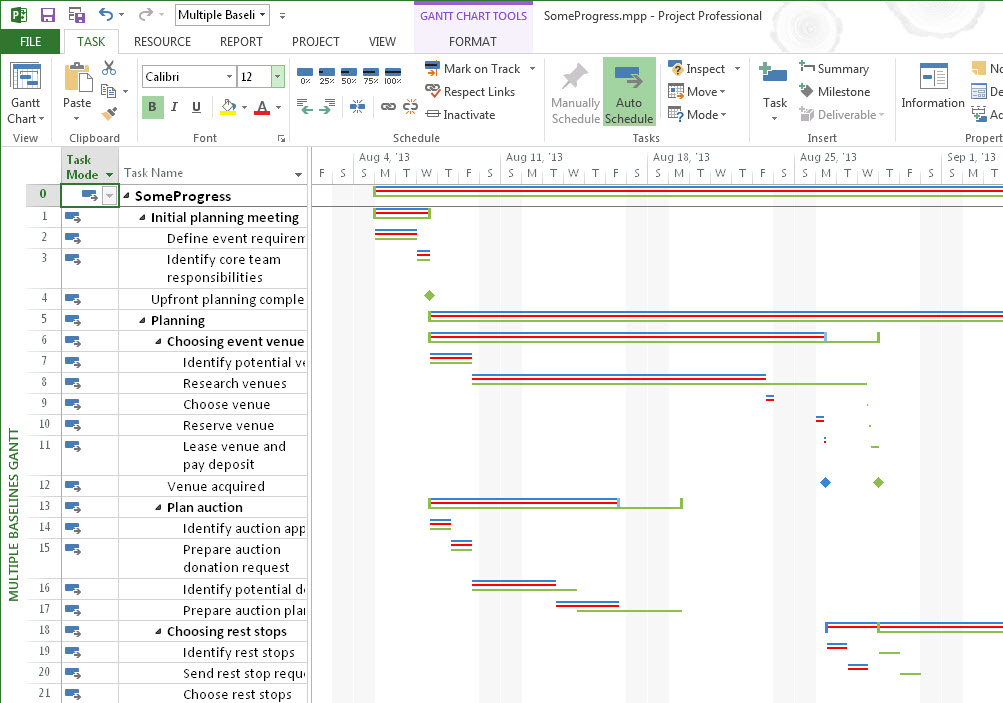
When you want to compare your current progress to your most recent baseline, Tracking Gantt view is perfect. It shows colored task bars for the current schedule above gray task bars for the baseline start and finish dates.

A Tracking gantt view with one baseline

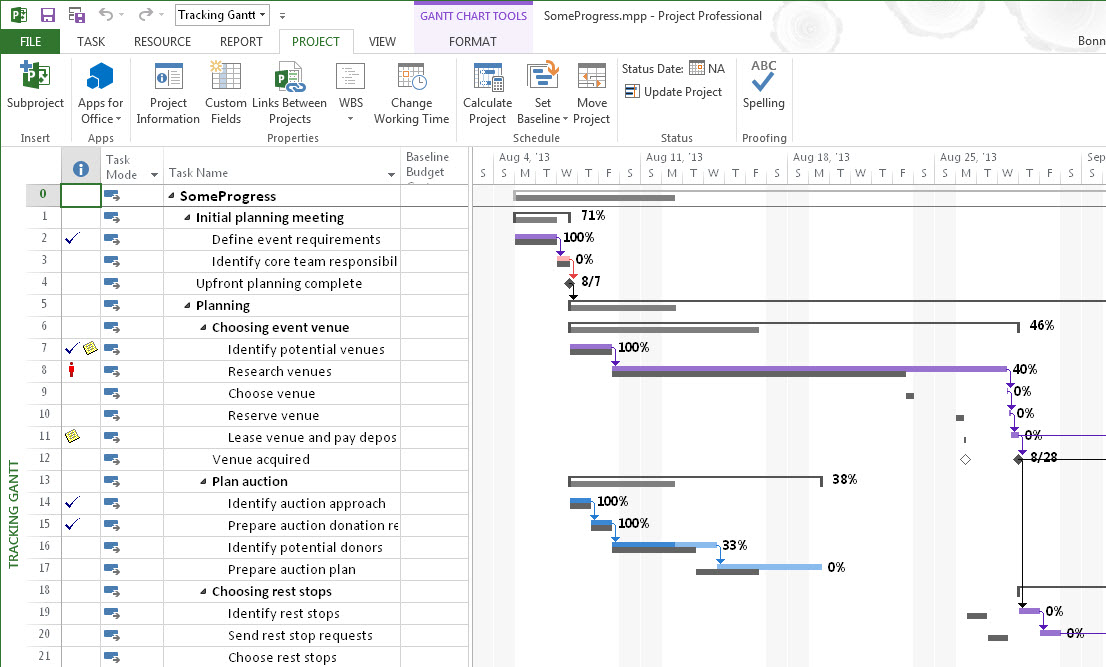
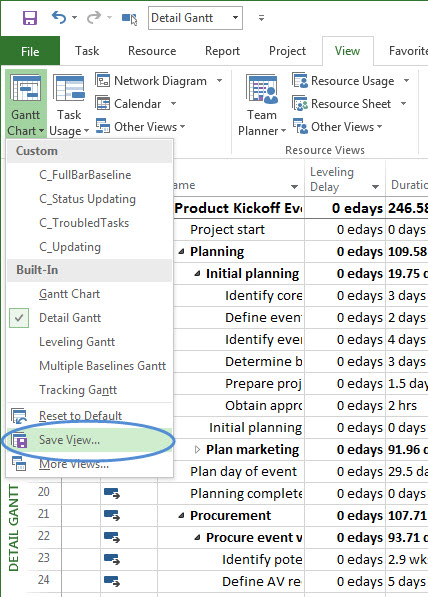
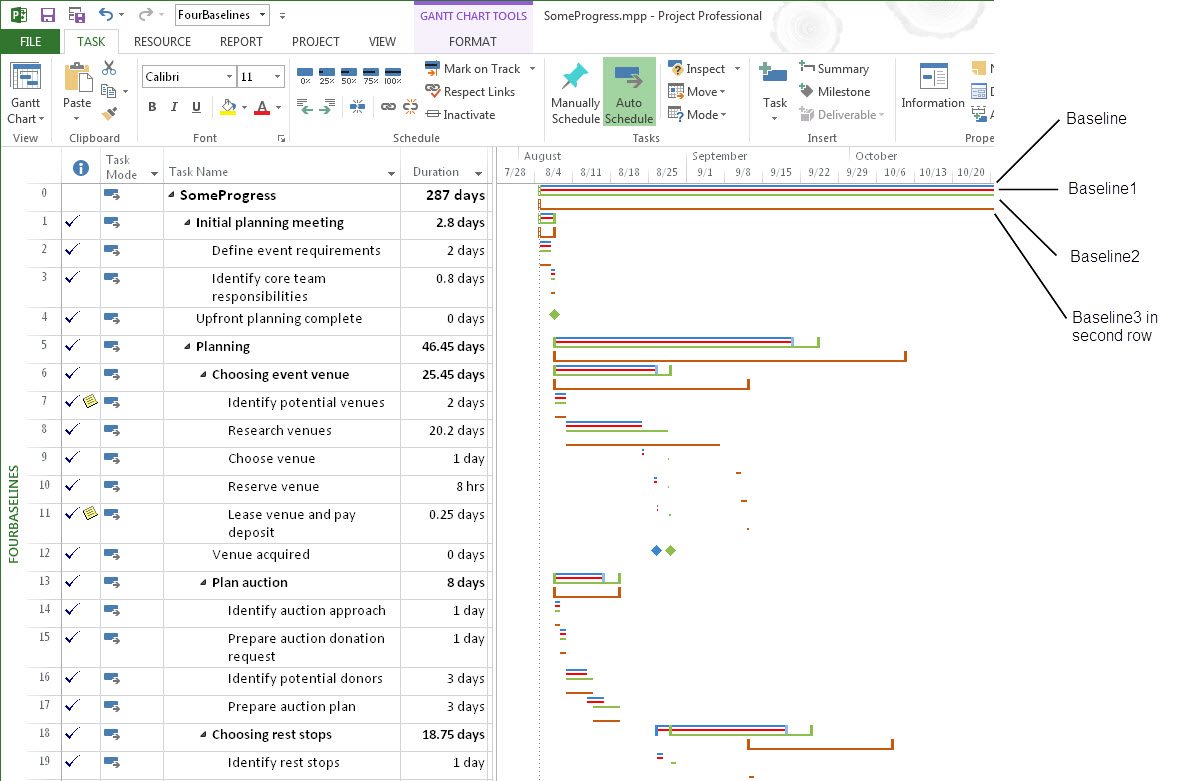
However, if you save more than one baseline, you may want to view them simultaneously so you can compare performance from one to the next. Multiple Baselines Gantt view displays different color task bars for Baseline, Baseline 1, and Baseline 2. To display this view, in the View tab’s Task Views section, choose Other Views –>More Views. In the More Views dialog box, double-click Multiple Baselines Gantt. Multiple Baselines Gantt shows task bars for only Baseline, Baseline1, and Baseline2. It doesn’t display task bars for the current schedule.

A Gantt chart with multiple baselines visible

To see different baselines or more baselines, you can modify your view in several ways. From the ribbon, you can display any baseline you want in any Gantt Chart view. Display the Gantt Chart view you want and then choose the Format tab. In the Bar Styles section, click the Baseline down arrow, and then choose the baseline you want to display. For example, if you display Tracking Gantt view, by default it uses Baseline for the baseline task bars. However, if you choose Baseline2 in the Format tab’s Bar Styles Baseline menu, the baseline task bars reflect Baseline2’s dates.

But what if you want a view to show task bars for Baseline1 through Baseline4 to evaluate trends over time? In that case, you can modify the view definition to do just that.

  1. Copy Multiple Baselines Gantt view and give it a name like FourBaselines. (With Multiple Baselines Gantt view displayed, in the View tab’s Task Views section, choose Other Views –>More Views. In the More Views dialog box, click Copy, type a new name in the Name box, and then click OK. Back in the More Views dialog box, click Close.
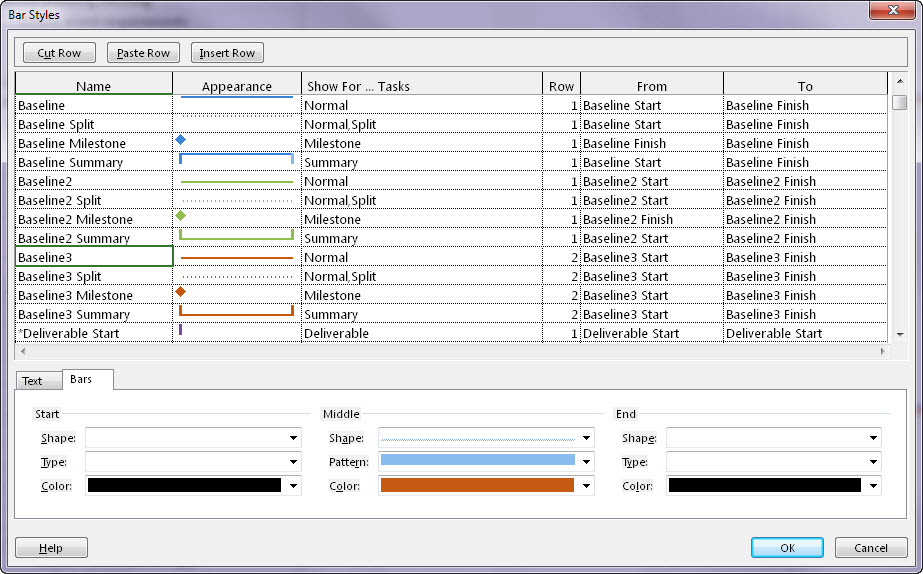
  2. On the Gantt Chart Tools | Format tab, in the Bar Styles section, click Format –>Bar Styles. The Bar Styles dialog box opens.
  3. Select the row for the task bar you want to duplicate (for example, Baseline2), and then click Cut Row.
  4. Before you do anything else, click Paste Row to insert the cut row back where it was originally.
  5. Select the row below where you want to insert the copied row, and then click Paste Row again. Project inserts another copy of the row immediately above the row you selected.
  6. Edit the new row’s Name, From, and To cells to match the baseline you want to show. For example, to display Baseline3, change the name to include Baseline3, and then, in the From and To cells, choose Baseline3 Start and Baseline3 Finish, respectively.
  7. On the Bars tab in the lower half of the Bar Styles dialog box, choose the shape and color you want for the bar. Baseline1, Baseline2, and Baseline3 already use red, blue, and green, so choose a color like teal, orange, or purple. In the Shape box, choose a top, middle, or bottom narrow bar.
  8. If you’re including more than three baselines in Multiple Baselines Gantt view, you have to add a second task bar row to the view. In the Bar Styles dialog box, in the task bar’s Row cell, type 2 to tell Project to place the baseline’s task bar on a second row in the Gantt Chart.
  9. Repeat steps 3 through 8 to create task bars for split, milestone, and summary tasks for the baseline.

Here’s what the bar styles definitions look like when you add another baseline to the view:

Picture of the barstyles for baselines

And here’s what the view looks like with more than three sets of baseline bars.

The multiple baseline gantt chart with an explanation of the bars

What About Interim Plans?

The Set Baseline dialog box has a second option: “Set interim plan.” Unlike Project baselines, interim plans save only start and finish dates, not duration, cost, and work. Interim plans are a holdover from earlier Project versions, when the program offered only one baseline.

Even with the 11 baselines that Project now offers, interim plans may come in handy. If you import a project schedule from Project 2002 and earlier (it could happen), any additional baseline information ends up in interim plan fields (Start1/Finish1 through Start10/Finish10). You can copy that data from the interim plan Start and Finish fields (Start2/Finish2, for example) into baseline fields like Baseline2.You can also save interim plans as partial baselines in between the full baselines you save.

Don’t forget: for a chance to win a copy of one of my books, visit Erik Van Hurck’s blog, The Project Corner.

Project Conference 2012: Drinking from the Firehose

drinking from the fire hoseMy first experience with  “drinking from a fire hose” was in college. The three days I spent in Phoenix at Project Conference 2012 brought back those memories. For me, the conference was a whirlwind of attending presentations, meeting exhibitors, catching up with old friends, and meeting new ones. I had good intentions of blogging during the conference, but each night when I got back to my room, I was so exhausted that the pillow won out. Here’s my PC12 memoir:

Monday: Travel ran as if it were managed by a project manager with unlimited resources, Project Server, and an administrator with a Starbucks IV hookup. My flight landed early and I hopped on the light rail right to the convention center just in time for the Microsoft Project Users Group reception.

The MPUG award presentation with Matt Davis and John Riopel from MPUG Project Talk and Ludovic Hauduc, GM of the Microsoft Project business unit, kicked things off perfectly. When I chatted with Matt and John during the conference, they boasted that they could answer any Project question. We’ll have to see about that. The MPUG event was the catalyst for me to meet one of the award winners, Gerald Leonard, who presented a session on critical chain project management. I’m a big fan of critical chain and the theory of constraints and now I’m psyched to try out ProChain, an add-in for Microsoft Project that offers critical chain features.

Gantthead’s welcome reception was a few hours of sipping cocktails, nibbling tasty snacks, and swapping business cards…..uh, doh! I knew I forgot something.

Tuesday: I walked over to the convention center in unseasonably cool air. Lucky me! A quick breakfast and caffeination and I was ready for the conference to begin. By the end of the opening keynote, I was pretty jazzed and it wasn’t the coffee talking.

christopheThe presentations and demos that Microsoft delivered during the Tuesday and Wednesday keynotes were awesome. As a former demo jockey, I know how tough it is to design demos that make people crave your products and then have those demos actually work — with one glitch left in to prove that the demo’s running in real time. The Microsoft folks did all that. I collaborate with a lot of people and I thought I was geekily adept with my collaboration tools. After I saw Keshav Puttaswamy, Christophe Feissinger, and a few others share info from Project to Project Web App to Visio to OneNote to Office 365 from desktop to laptop to Windows tablet to Windows phone to — um, I don’t even remember the rest — I’m ready to play and share well with others. I was also impressed that Microsoft even did a demo with an iPhone! Boy, have times changed.

clouseauChristophe put up with some good-natured razzing over his moustache. Ludo compared it to The Artist, but I had hoped Christophe would slip into an Inspector Clouseau persona.

Tuesday, Wednesday, and Thursday:

It was tough to choose which presentations to attend. The content and quality were overwhelmingly good. Danny Smith from Marquette University talked about project portfolio management that works. Marquette has set up a sweet-sounding environment. However, Danny’s unflappable character seems like it would help any system run smoothly. (I also liked his comment about how shiny things pull focus away from the important stuff. So true.)

Mary Ellen Kliethermes and Sharon Harness from Ameren talked about how to implement Project Server with little or no consulting money. The bottom line on that presentation: use virtual servers (VMWare) to eliminate hardware cost, tackle the implementation in chunks to see what does or doesn’t work, and be prepared to really work at it.

Speaking of Project Server and project portfolio management, hosted Project Server in the cloud, in some cases, pre-built environments should make this technology more accessible to organizations. Lots of companies don’t have the hardware, people, or money to put together their own Project Server environment. Hosted systems offered by Project Hosts, Bemo, or Shar;’kPro could be the answer. For example, subscribe for the length of time and number of users you need; or get a ready-made configuration; or expand without having to line up more hardware, software, or system administrators.

On Wednesday I enjoyed a half hour of fame signing books for a long line of patient fans. Because my book partner, Teresa Stover, couldn’t attend, I signed my book, Successful Project Management, and Teresa’s Microsoft Project 2010 Inside Out. I also signed a few copies of Your Project Management Coach, a book co-authored by Teresa and me and published by Wiley. (Thanks to Microsoft for putting the book signing together.) During my book signing slot, I was lucky enough to finally meet Carl Chatfield in person. Carl’s and my books, Project Step By Step and On Time! On Track! On Target!, were paired for several years as a project management kit. His Step by Step book is one of my favorites. People told me he is recommending my updated and improved edition, Successful Project Management. Thanks Carl!

That close encounter with Carl spawned an idea. I felt honored to have people stand in line to shake my hand. But several other of my favorite Project authors were present, so I did the paparazzi thing and snagged some pictures with yours truly. Sadly, the photo with Eric Verzuh of Fast Forward MBA in Project Management fame was too blurry to include.

eric_uHowever, here I am with Eric Uyttewaal who wrote Forecast Scheduling, a great book on scheduling with Project. I did catch up with Gary Chevetz and Dale Howard from ProjectExperts (but didn’t remember to take a picture). And I also finally met Larry Christofaro in person. He has written some incredible articles over the years.

Now I’m home and back to work. Since you’re reading this post, I obviously finished my #1 priority. Next up is emailing and sending LinkedIn invitations to the people whose business cards I gathered at the conference. (Bonnie’s project management tip of the day: If you promise to do something for someone, do it!)