From Newbie to Know-it-all

technology expertI knew nothing about Project, QuickBooks, Visio, Basecamp and other tools when I started. I was a project manager and business owner faced with complicated tools I needed to do my jobs. Here are the techniques I use to master software quickly:

Take classes: Take more than one. Different teachers cover different topics and might provide great tips you haven’t heard anywhere else. Students learn in different ways – listening, watching, doing, and so on —  so it’s important to find an instructor who teaches in a way that resonates with you.

Read a book or two: If you’re really serious about mastering a product, get a book about it. Books can go into a lot more detail. Plus they have indexes to help you find topics and paper books are easy to flip through. eBooks are easy to search.

Read blogs about the product: Whether it’s the product blog or a blog from another organization, you can find incredibly helpful information there.

Search help: But don’t start in the in-product help. Use your browser and try different combinations of keywords or phrases. You’ll find results from product help but also from numerous other sites. Those other sites often have more detailed answers and great troubleshooting tips. Click the results that sound most like your question. If you don’t find an answer, click other results or try new keywords in your search. I have a very old HP LaserJet printer that works like a champ. I followed many links and eventually found info on the driver I needed to get the printer to work with Windows 10 – buried deep within HP help.

Post questions in product forums/groups: Product-related groups on LinkedIn, forums on the product website or forums hosted by other organizations have lots of knowledgeable people willing to share their expertise. You’re more likely to get helpful answers if you describe your issue in detail. Include the steps you took, what you expected, and what happened instead.

Explore on your own: Poke around the software. Try things. Test what happens when you perform different steps or use different software options. Use sample files to experiment. The more you do this, the better you’ll get at discovering things on your own.

Note: It’s tempting to immediately jump to asking an expert for an answer. That’s reasonable when you’re facing a tight deadline. However, you’ll learn and remember more when you expend some effort finding your answer.

Check out my courses on Linked In Learning here.

This post contains affiliate links, and I will be compensated if you click my links and make a purchase.

#project, #quickbooks, #projectpointers, #bonniebiafore


Working with Home-based Team Members

With home-based team members, it’s helpful to understand some of their habits. Here are a few that help you with them effectively:

Identify each team member’s preferred work hours: Home-based team members face challenges like childcare and home schooling. Find out when they’re the most productive. Don’t make assumptions. A colleague of mine used to assume home-based employees preferred contact during regular business hours. Only after a conversation did he learn that his employee tried to work a late shift so he could home-school his children in the morning.

Uncover what inspires ideas for your team members: We all have habits to recharge or generate new ideas. Some do this alone, while others prefer discussions. You can support team members when you know their preferences. Because you can’t see this behavior with remote employees, you have to ask. This knowledge guides you to intervene and ask questions, invite them to discuss situations, and arrange task deadlines so they have time to generate new ideas or solutions.

Do they prefer working solo or collaboratively?: This basic characteristic is often overlooked, even though it’s critical for maximizing someone’s productivity. With many people now working from home, don’t assume they are adjusting to working solo. Be proactive to understand their preference and support their need to work solo or collaboratively.

Share your own habits: If your employees know your patterns, they can work with you more effectively. They will understand how and when you are most likely to respond. Let your virtual team members know which tools you use and how frequently. Do you check email once a day and voicemail five times a day, or is it the other way around?  Share the working hours during which you are likely to respond for non-emergencies.

Understanding habits can help set expectations, create better working relationships, and improve team collaboration and communication.

For more about working with your team members, check out my Project Management Foundations course.

This post contains affiliate links, and I will be compensated if you click my links and make a purchase.

Taming a Crazy To-do List

No matter how carefully I manage my workload, I end up buried with to-dos every so often. If you’re like me, an overwhelming to-do list could make you freeze up and not get anything done. My solution is time-management heresy!

Crossing a to-do off my list gives me a boost of energy and motivation to get more done! So, I do something quick and easy that I want done, even if its priority couldn’t be any lower. With my energy and motivation restored, I can go back to a more orthodox time management approach. My newest course, Project Tips Weekly, releases one short movie each week, so it’s a great example of this tactic—from my perspective as the author as well as for viewers.

Here’s how to tame an overwhelming to-do list:

1.      Pick a task that won’t take much time (5 to 10 minutes max) and that you want to get done. You know which one it is. Maybe it’s cleaning up the receipts on your desk, mapping out your day, or watching a LinkedIn Learning movie!

That’s one thing less to do. If you keep a list of to-dos, you can mark the task as complete and bask in that feeling of accomplishment. That brings up a question…

2.      Do you have a to-do list?

A heap of crumpled, smudged notes with scribbled to-dos doesn’t count.

If you don’t have a list, take 10 minutes and add everything you can think of to it. Include importance, urgency, and level of effort for each entry if you know what they are. (Stop at 10 minutes. You can add to the list any time later on.)

Writing up a list on paper does commit you to your to-dos, and you get satisfaction from drawing a line through each task you complete. However, you’ll rewrite to-dos onto new sheets as priorities change and new to-dos come up. If you throw past lists away, you lose your work history, too.

A spreadsheet, OneNote table, or some other app can help in a lot of ways. You can sort the entries by importance, urgency, or level of effort. You can mark to-dos as complete and move them to your completed list. If you include the date you complete each to-do, you can motivate yourself when you’re feeling down by looking back at everything you’ve accomplished the past, week, month, or year.

3.      Sort the list by importance, then urgency, then level of effort.

With a sorted to-do list, it’s easy to see your important and urgent to-dos.

In the example below, I have one to-do that’s important, urgent, and doesn’t take a lot of time: prepping movies for my Project Tips Weekly course – which has one short tip come out each week. Depending on the tip, I can get one prepped in an hour or two. That’s definitely the first thing I’m going to tackle after the next step.

4.      With the sorted list in front of you, get your important and non-urgent to-dos on your calendar!

Because they aren’t urgent, they’re easy to forget unless you schedule them. Be realistic. Don’t try to finish them all in the next few days. Space them out so you have time for important and more urgent work.

Last year, I made a list of places I would like to visit on vacation. Some friends and I agreed those were places to go and that’s how it sat for almost a year. Finally, I realized I needed to get at least a few on the schedule, so I typed in 2018, 2019, 2020 into OneNote and then moved my top-priority vacation spots into one of those years. Lo and behold, four of those are now on my calendar!

LinkedIn Learning videos might fall into this category. Suppose you want to learn a topic, whether it’s Microsoft Project, gathering requirements, or fixing your photos with Photoshop. You can schedule 10 or 15 minutes every day or two to watch a few movies on that topic. Before you know it, you’ve finished an entire course!

5.      Now, grab one of your important/urgent to-dos and get to work!

By the end of the day, you may have finished several things on your to-do list, including a couple of important, urgent tasks. Move those to-dos into a Completed list and enjoy another energy boost seeing how much you’ve accomplished.

I’m enjoying working on my Project tips course. Instead of prepping several dozen movies in a short time, I can add individual movies to my to-do list – one each week for the next calendar quarter.

6.      Before you call it a day, take 5 to 10 minutes to plan what you will tackle from your list tomorrow.

It might take a week to get the to-do list under control. However, it takes only a few minutes each day to keep your list under control. For more on time management, check out Chris Croft’s course.

Saving Customized Views in Project

Saving custom views is easy when you plan ahead. Modifying a built-in view and then saving it as a custom view is still easy, but it does take a few more steps.

If you set out to save a customized view to use again and again, the steps are easy:

1. Display the built-in view that’s closest to what you want, like the Detail Gantt view.

2. On the Task tab or View tab, click the bottom half of the Gantt Chart button, and then choose Save View.

3. In the Save View dialog box, name the view, for instance, C_Updating, and then click OK.

I like to add C_ at the beginning of each custom view, so they’re easy to spot in drop-down lists and in the global template.
Project creates the new view and a new table (C_Updating Table1) to go with it.

4. Now you can customize the view and table however you want.

The custom view is available to use in the future – and the original built-in view is still available.

What if you display a built-in Project view and go wild building a super-cool customized view with filters, groups, timescale settings, table columns, and formatting? THEN you realize you want your creation to be a custom view and you want the original built-in views definition back. No biggie. A few more steps get you where you want to be.

Suppose you want a view for updating tasks. You’ve displayed the built-in Tracking Gantt view, applied the In Progress Tasks filter, set the timescale to days, and added and rearranged columns in the table. Remember, when you modify a built-in view, Project saves copies of the modified view and table in your Project file (using the built-in view and table names). The global template still contains the original built-in definition of the view and table.

Here’s what you do to save the modified view as a new one and bring back the original built-in view:

1. On the View tab, click the bottom half of the Gantt Chart button (or any other view button like Task Usage or Resource Usage), and then choose Save View.

2. In the Save View dialog box, name the view, like C_TaskUpdating, and then click OK.

Just like saving a view before you add all the modifications, Project saves the new view and a new table, in this example, C_TaskUpdating for the view and C_TaskUpdating Table 1 for the table. If you have the “Automatically add new views, tables, filters, and groups to the global” option turned on (it’s in the Project Options dialog box Advanced category), Project also saves the new view and table to your global template.

3. To get the built-in view (Tracking Gantt in this example) back to its original definition, click the bottom half of the Gantt Chart button (or the appropriate view button on the View tab) and choose the built-in view.

4. Click the bottom half of the Gantt Chart button (or other view button) again. This time, on the drop-down menu, choose Reset to Default.

5. When the message appears telling you that you are about to revert to the view from your global template, click Yes.


Now, you have your new view with all its customization, and your built-in view is back to the original definition.

On another note, what if other team members need access to your project along with your custom view handiwork but don’t have Microsoft Project? You might want to check out Microsoft Project Viewer.


Outlook Rules Rule

Microsoft Office rules can take the drudgery out of managing emails. Say you get a gazillion emails from the treasurer of the board you belong to and you want all those emails to go into a separate folder. A rule can automatically move emails from that email into the folder you specify. Even better, suppose you get emails from someone you’d rather not hear from. You can set up a rule to delete those emails straight away.

Once you’re spoiled by Outlook rules, you won’t want to work without them. If you get a new computer or use Outlook on a desktop and laptop computer, you can move your rules from one computer to another.

Let’s take a quick look at how to create a rule in Outlook 2013.

  1. In Outlook, you can select an email to grab its email address to start your rule. If you aren’t going to use an email address, skip this step.
  2. On the Home tab, in the Move section, choose Rules, and then choose Create Rule.
  3. In the Create Rule dialog box, turn on the checkboxes for the conditions you want to use. For example, if you selected an email, turn on the From [email address] checkbox. You can also turn on the “Subject contains” checkbox and type the words you want, such as “to-dos.”
  4. In the Do the following section, tell the rule what you want Outlook to do with the incoming email. For example, turn on the “Move the item to folder” checkbox, and then select the folder you want, such as To-Dos or Deleted Items (if you want it gone). If you don’t have a folder yet, in the Rules and Alerts dialog box, click New and create the folder.
  5. Click OK. At this point, a Success message box appears. To apply the rule to all existing messages, turn on the checkbox whose label starts with “run this rule now” and click OK.

Now let’s get rules over to another computer:

  1. On the Home tab, in the Move section, choose Rules, and then choose Manage Rules & Alerts.
  2. On the E-mail Rules tab, click Options (just above the Rule table).
  3. Click Export Rules.
  4. Select the folder where you want to save the rules file. In the File name box, type a name for the file.
  5. Click Save. The rules export file has an .rwz extension.

rules

To import the rules on another computer:

  1. Copy the rules export file to that computer or make sure it’s available on the network.
  2. Open the Manage Rules & Alerts dialog box on that computer, click Options, and then click Import Rules.
  3. Select the rules export file.
  4. Click Open.

Ta-da! You’re rules are available in Outlook on this computer.

Type Faster with AutoCorrect

Does your brain produce words faster than your fingers can type? Are you tired of correcting your fat-fingered typos? Microsoft Office AutoCorrect not only fixes typing mistakes. You can take the tedium out of typing by building shortcuts for long words of phrases into AutoCorrect.

Out of the box, AutoCorrect has fixes that change misspellings like abotu into about, or replaces “:)” with a happy face. If you consistently mistype words, you can add the typo and the correct entry to AutoCorrect. That way, AutoCorrect automatically fixes it next time around. A couple of my consistent typos are cateogry and accoutn.

Why not use AutoCorrect to speed up your typing, too? When I’m working on a QuickBooks book, I use phrases like dialog box, dialog boxes, financial institution, and “On the Home Page, click Create Invoices” a gazillion times. But I don’t have to type them out every time. I create AutoCorrect entries for phrases like those, and let it do the heavy lifting. When I type dbx, AutoCorrect changes it to dialog box. Dbxs turns into dialog boxes. Finin expands to financial institution. And hpci bursts out into On the Home Page, click Create Invoices.

By the way (AutoCorrect shortcut btw), when you set up AutoCorrect entries, they work in Word, Excel, Outlook, and so on. Try it. I think you’ll like it.

Here’s how to create AutoCorrect entries:

  1. On the File menu, choose Options, and then choose Proofing.
  2. In the Word Options dialog box, click the AutoCorrect Options button.
  3. In the AutoCorrrect dialog box, type your shortcut in the Replace box.
  4. Type the expanded phrase in the With box.
  5. Add additional entries it you want.
  6. When you’re done adding entries, click OK to close the AutoCorrect dialog box.
AutoCorrect

AutoCorrect entries

That’s it! The only downside is when you work on someone else’s computer and dbx stubbornly refuses to expand.

If you get a new computer, it won’t have all your AutoCorrect entries. No problem! You can copy a file with your AutoCorrect entries to another computer. The hard part is knowing where to look for the AutoCorrect file.

It’s in C:\Users\<your user name>\AppData\Roaming\Microsoft\Office. The file you want for English is MSO1033.acl. All you have to do is copy that file onto a thumb drive, plug the drive into the other computer, and copy it into the same folder on the other computer. (If you’re copying to a brand new computer, overwriting the file is perfectly OK. If you overwrite a file that already has custom AutoCorrect entries, those entries are gone.)

Git ‘em done!

todo_listAt a recent work reunion lunch, two of my former colleagues looked at me sheepishly as they confessed that they hadn’t made any progress on their respective book ideas since the last time we met. Yeah, like I get everything done that I intend to…but their confessions did make me reflect on some of my self-motivational tricks.

Sometimes, my workload looks like an unfortunate wild pig in an anaconda’s belly (except that, unlike the snake, I don’t get to rest for weeks afterward without additional input). My ability to chew through work isn’t due to genius, drugs, output of minions, or Santeria spells. Deadlines are a huge motivator for me and, hooboy, do publishers have deadlines.

However, I also have a few tricks that help me git ‘em done. If some of your New Year’s resolutions are starting to smell overly ripe, maybe one of these techniques will help.

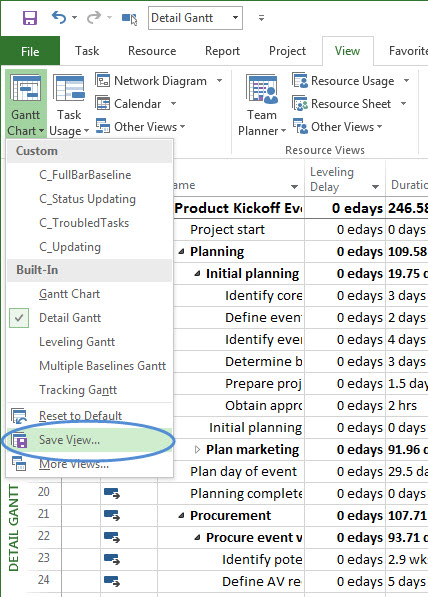
1. Break a big project down into pieces.

Big projects can be scary: write a book, revamp a website, end world hunger, stop the zombie apocalypse.

Don’t let the big picture paralyze you. Take a sledgehammer to a big project and break it into pieces that aren’t scary. You don’t have to do everything at once. You don’t even have to build a plan in one sitting!

  • Start by jotting down what you know about your project.
  • Write down what you don’t know but need to find out.
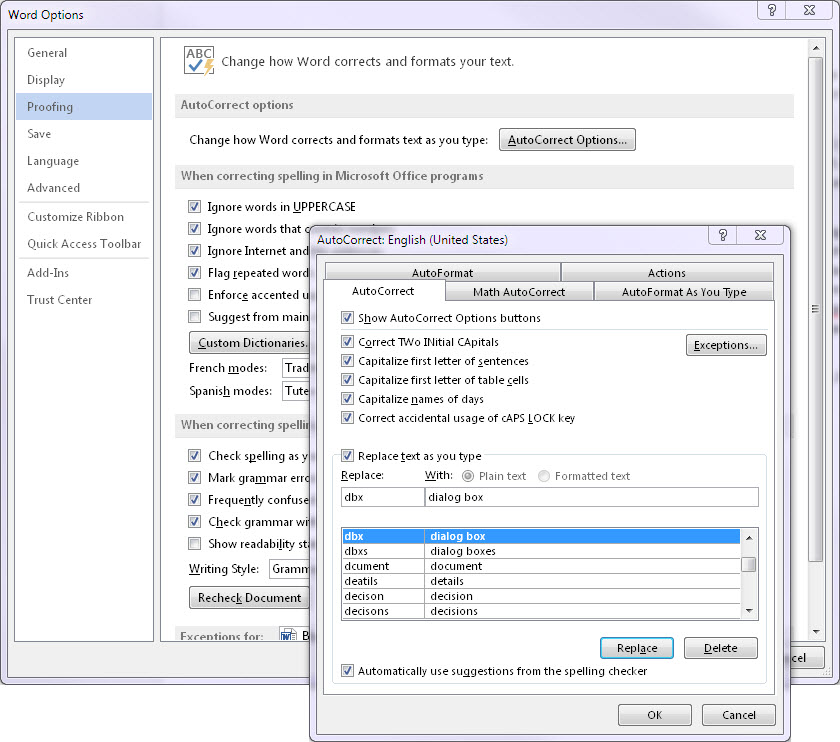
  • Any time you think of something else (a task, goal, result, and so on), add it to your notes. (Use your favorite tool to store this stuff: a word processing document, spreadsheet, a spiral bound notebook, an electronic notepad, whatever.)
  • Once you have some manageable project to-dos http://www.bonniebiafore.com/productivity-hack-6-all-i-have-to-do-is/, add them to your to-do list (read tip #2 for the how-to).

Hint: If you aren’t ready to tackle a big project, don’t force it. Add an entry for the entire project to your to-do list (tip #2), so you don’t forget about it. If the project is something you can’t put off, like preparing your tax return, then hammer away (and give yourself small rewards after you finish each small step).

Here’s how I tackled modernizing my web site (which, by the way, had been on my list for about four years). I was a tad overwhelmed by what’s changed online since I first set up my website: Web 2.0, search engine optimization, responsive web pages, and so on. So I started by finding someone to help me. I have a lot of friends with web pages, so I asked around. Scott Baird (scott@bairdllc.com) was the unlucky, but very competent soul I chose to work with.

A few phone calls and emails were all it took to come up with project to-dos: choose a Word Press template, plan the new layout, build the site, add content, review, test, and tweak. Scott recommended a few templates to consider (out of tens of thousand), so that step wasn’t too bad.

My next to-do was more involved: I had a good idea of the web pages I wanted, but I needed to figure out how I wanted each page laid out and gather the content for each one. I tackled this task one web page at a time. It went something like this:

  • Create a Word document for my notes.
  • Add a heading for a page.
  • Write up notes about the page layout.
  • Edit the notes.
  • A sip of wine.
  • Edit the notes some more.
  • Another sip of wine.
  • Copy existing content into the file.
  • Track down links to insert.
  • Another sip of wine.
  • Find the images to include, copy them to a folder, and add the image filenames to the doc.
  • Some more wine.
  • Continue until too tired, bored, or tipsy to do more.
  • Rinse and repeat on following days until all the pages were done.

I used the same technique for my review. Small doses of reviewing each page and documenting the changes needed. Scott made a lot of the changes initially. As the tweaking continued, I edited more so I learned how to maintain my site.

All told, it took about three weeks — an hour or two each day — to complete the work. If you’re trying to cut back on your wine consumption, the next tip shows you how to coax yourself into gittin’ your to-dos done.

2. Pester yourself.

Have you ever been harried by someone impatiently waiting for you? A small child in a snowsuit in desperate need of a bathroom, for example. You do whatever it takes to get them out of your hair, off your back, or out of your back hair for that matter.  Keeping to-dos in view is one way to apply that same kind of pressure. You may be surprised how much you get done just for the sake of shortening that list.

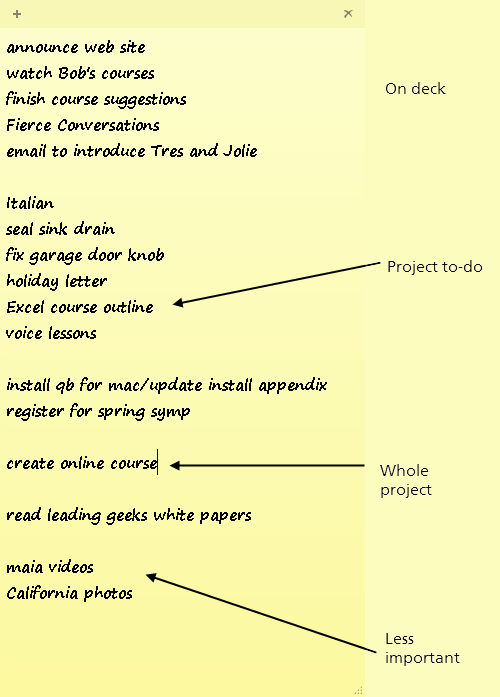
The reminder tool I use is a Windows 7 electronic sticky note on my computer monitor. I throw everything into one note that sits at my primary monitor’s top-right: work, personal, important non-urgent stuff, honey-dos without a honey to do them, and fun stuff like learning Italian, playing the accordion, or training the neighborhood mountain lion to fetch. (Only one of these fun things is on my actual to-do list.)

I add, delete, revise, and rearrange to-dos as often as I want. I move to-dos with looming deadlines closer to the top of the list. The ones at the top tickle my attention: “Hey! How about now?” I sometimes knock out a simple to-do, because crossing something off my list gives me a boost of energy, which can kick-start a tougher to-do. I delete to-dos when they’re done (or I decide I don’t need to do them anymore).

Remember tip #1 and those projects that aren’t ready for primetime? Put them in the bottom half of the list. They might sit there a while like my website modernization. I scan the entire list several times a day, and eventually, those projects’ time will come.

What if you aren’t chained to your computer? Take a photo of your sticky note to-do list with your smartphone. If you have some spare time while you’re out and about, dig into one of your assignments, which leads into the next tip…

3. Carry a notepad at all times.

Reporters and cops carry notepads and you should, too. If you remember something you forgot to add to your list, write it down. If the perfect chapter opener comes to you, write it down. If you’re in line at the department of motor vehicles, write a whole damn chapter.

For something really quick like that perfect chapter opener, turn on your phone’s voice recorder and record it. A notepad app on a smartphone will do in a pinch. My issue with smartphone notes is that typing intelligible notes on a phone keyboard demands so much concentration I might forget some of what I wanted to document.

4. Get colleagues to apply pressure.

Let’s get back to my former colleagues who were embarrassed by their lack of progress. I wasn’t calling them every week asking “How’s it going? Are you done yet?” But they felt guilty about not making progress, because they had told me about their plans. Committing publicly to goals can be a powerful motivator.

If you aren’t living at home with your mother keeping after you to get things done, invite cohorts to help. It’s a win-win. Everyone in the group feels peer pressure to do what they told the group they would do. (Face-to-face is ideal, but Google Hangouts, conference calls, and even email exchanges can work, too.)

Each person commits to goals and timeframes. Then, at meetings, each person talks about what they’ve done, what they haven’t done, and what they’re going to do about it. Another plus, members can help each other get unstuck by answering questions, making suggestions, or holding an intervention.

OK, enough. *My* to-do list is peeking from behind my document window and I feel the urge to get something done.